 In particular, this article is about how to install the GlowStep Revolution RV steps - the ultimate upgrade that’s a perfect addition to your trailer. Are you sick and tired of the steps that came with your 5th wheel, travel trailer or toy hauler? They are usually bouncy and rock the trailer when someone is entering and exiting. Drawbridge style of steps proximity to parking while in storage or at the campground can be an issue and your old steps could potentially injure your pets by getting their toe nails caught in the little cheese grater holes.
These kinds of steps can be a deal breaker – so we manufactured RV steps for towables that prevent all these issues and are actually a joy to have installed on your trailer! The easy bolt-on RV step installation fits into the factory step compartment, replacing factory steps. Since the steps are installed in the factory compartment, they remain conveniently outside the RV. Drawbridge style steps that fold up and store inside the doorway of the unit fling and dump dirt, water, sand and other unwanted debris all over you and inside your RV. The drawbridge step is also a concern when parking in tight spaces.

Whether you just purchased the steps and are looking for the best way to install them or are curious about the installation before purchasing – reading the instructions is always the best idea! Another thing to consider before buying the steps as well is measuring your RV step opening to make sure you’ve purchased the correct size steps that will fit! We currently have two widths available, 25.5-inch and 27.5-inch and if your steps are somewhere between or larger, we do have Vertical Stud Adapter Brackets and Spacer Kits to help perfect your installation.


How to install the GlowStep Revolution
- Level the trailer on flat ground and remove the factory steps.
- Determine the proper mounting height of the GlowStep Revolution frame. The top of the GlowStep Revolution should sit as close to the optimal mounting height as possible to allow for the most adjustability when installed.
2a. Before installing the GlowStep Revolution, it’s good to look at what you currently have installed to make sure there are no modifications needed for installation (Example: Old factory steps are welded to the frame)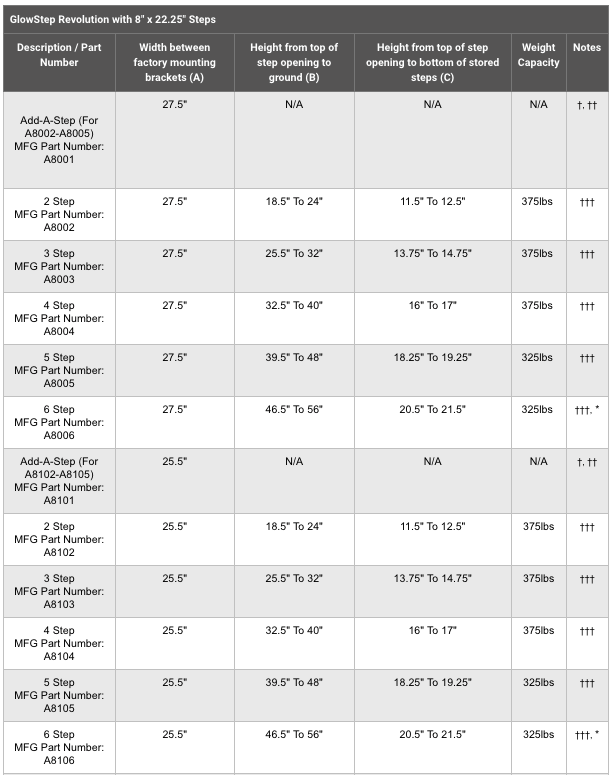


- Unfold the GlowStep Revolution. One person can hold the GlowStep Revolution frame in place as needed while the hardware is installed. The feet should be resting on the ground to reduce the weight being held by the person.
Tip from our Customer Service Team: While a one person installation is achievable, it’s much easier to have an extra set of hands helping!

3a. If you are unable to have someone assist you with the installation, installation can be achieved by lifting one of the step release levers to pull the GlowStep assembly out from the GlowStep Revolution frame. Remove the hardware attaching the GlowStep assembly to the pivot arm. Save this hardware as it will be used later. Now your steps are no longer attached to the frame, making it lightweight and easier to install on your own.
- The GlowStep Revolution frame can be mounted with either 3/8-inch hardware through the inner holes or mounted with 5/16-inch hardware through the outer holes as shown below. Side brackets can vary by manufacturer and may need to be trimmed to clear the hardware protruding through the sides of the GlowStep Revolution frame.
4a. Once installed, torque the 3/8-inch hardware to 25 ft-lbs, or the 5/16-inch hardware to 15 ft-lbs.

- If you removed the GlowSteps for installation, now is the time to reinstall them into the frame that’s installed in your factory RV step area. Return to step 3a and reverse how you took the steps out to complete this step.
Adjust the GlowStep Revolution step height to match the terrain that your trailer is parked on. Campsites rarely have level terrain so the GlowStep Revolution offers 7-inches of vertical precision elevation adjustment. What does this mean for you? Looking at the diagram below, with your new GlowStep Revolution you have three levels of height adjustment at the top of the steps, and with the All Terrain Landing Gear you have five levels to make sure that no matter what height or kind of terrain your RV steps have to contend with, the GlowStep Revolution steps will always be level and have heights that are similar to the staircase found in your home.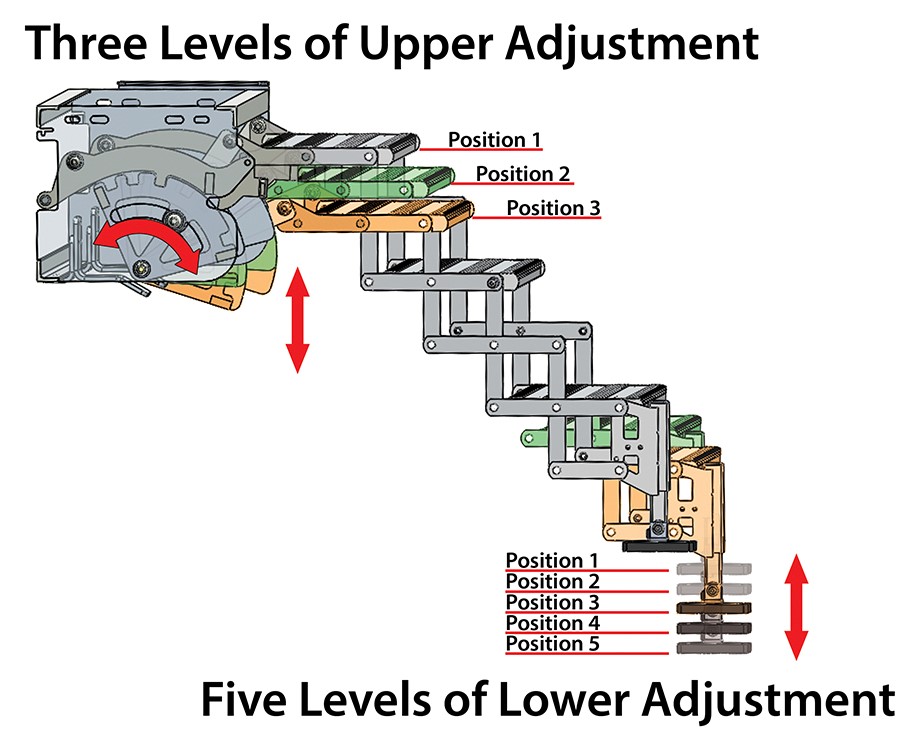

By connecting the RV to the ground (Earth to RV) the unstable and unsafe diving board feeling associated with factory steps is completely eliminated. It is extraordinarily sturdy with a level of stability that is simply unmatched. The step's adjustable features are like planting roots each time you deploy the steps, giving you that feeling of security everywhere your RV takes you.
If you are the kind of person that prefers to see steps visually instead of reading about them, watch the installation video below that shows and explains the GlowStep Revolution installation.

For more information about the GlowStep Revolution or help installing your steps, feel free to give our experience Customer Service Team a call at 800-246-8132 and we’d be more than happy to assist you! If you are feel that you’re comfortable about the installation and are ready to upgrade your RV steps, you can visit one of our Torklift Certified Dealers and purchase your steps today.
Happy Camping from all of us at Torklift!

Written by Kerstin Stokes:
As a graduate from the College of Idaho with a B.A. in both History and Art, Kerstin has found her passion for writing and marketing, and has loved every minute of working for Torklift for over 2 years. She enjoys looking up tasty recipes for baking and daydreaming about future travels.