If you've never installed a hitch before, take a deep breath, you've got this. I've put this one on the bench plenty of times, and the X7540S EcoHitch for the 2026 Subaru Uncharted is one of the more straightforward installs out there. There's no drilling and no wiring required for the hitch itself. Most of the job is removing a few covers, fishing some bolts into the frame, and bolting everything up to spec.
Set aside a couple of hours, grab a buddy to help lift the hitch into place, and follow along. I'll walk you through each step the same way I'd explain it to a friend in my own shop. Read the whole guide once before you start so nothing catches you by surprise.
Before You Start: Tools & Time
Here's what to have within arm's reach before you get under the vehicle:
•A way to safely lift the vehicle (a lift, or a jack with jack stands rated for the weight)
•10 mm socket and a ratchet
•A large flat-head screwdriver or trim tool (for the plastic clips)
•A 3/4" socket and wrench for the 1/2" hardware, plus a socket for the M10 nuts
•A torque wrench (this is not optional, the bolts need to be tightened to spec)
•A reciprocating saw or body saw with a fine blade for the small panel trim in Step 7
•A helper for lifting the hitch into place, and safety glasses for working overhead
Time needed: plan on about 1.5 to 2 hours for your first install. There's no rush — taking your time is what makes it come out clean.
Step 1: Lift the Vehicle and Remove the Bumper Covers
Start by raising the vehicle on the manufacturer's approved lifting points and supporting it safely. Once you're underneath, look up at the rear bumper area, you'll see eight plastic bumper clips holding things in place (shown by the arrows in the photo below).
•Pop out all eight bumper clips shown in Figure 1.1.
•Remove the plastic nuts holding the two lower plastic covers. Use your large flat-head to gently pry, and a 10 mm socket to back off the nuts.
•Pull down on the panels as you go, then set both lower covers aside somewhere safe — you’ll reinstall them at the end.

| Pro tip: Keep all the clips and plastic nuts in a small bowl or a labeled bag. They’re easy to lose, and you’ll want every one of them when you put the covers back on. |
Step 2: Uncover the Frame Holes
With the covers off, look at the inside of the frame on each side. Toyota covers the holes you'll be using with stickers from the factory.
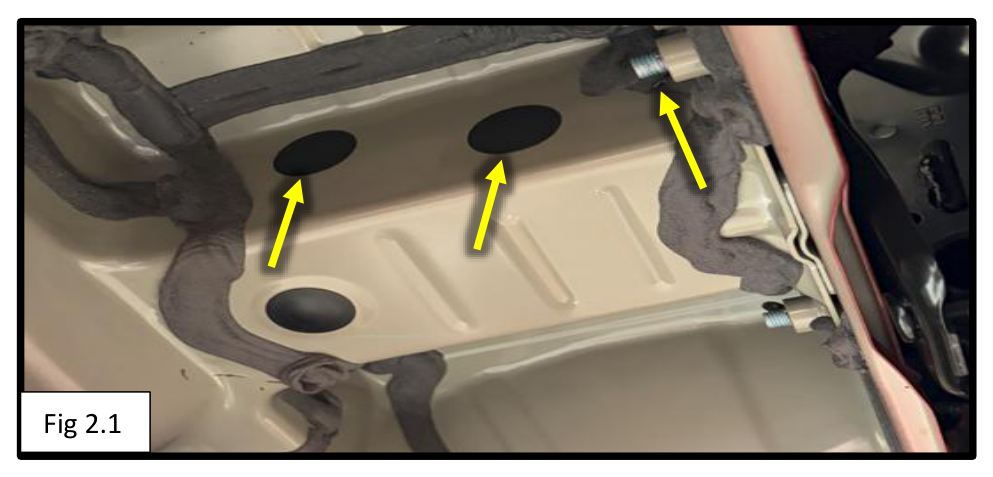
•Peel off the stickers covering the inner frame holes, there are two per side.
•If you find any factory seam sealer around the edges, scrape off just enough so the metal frame plate can sit flat against the frame later. See Figure 2.1.
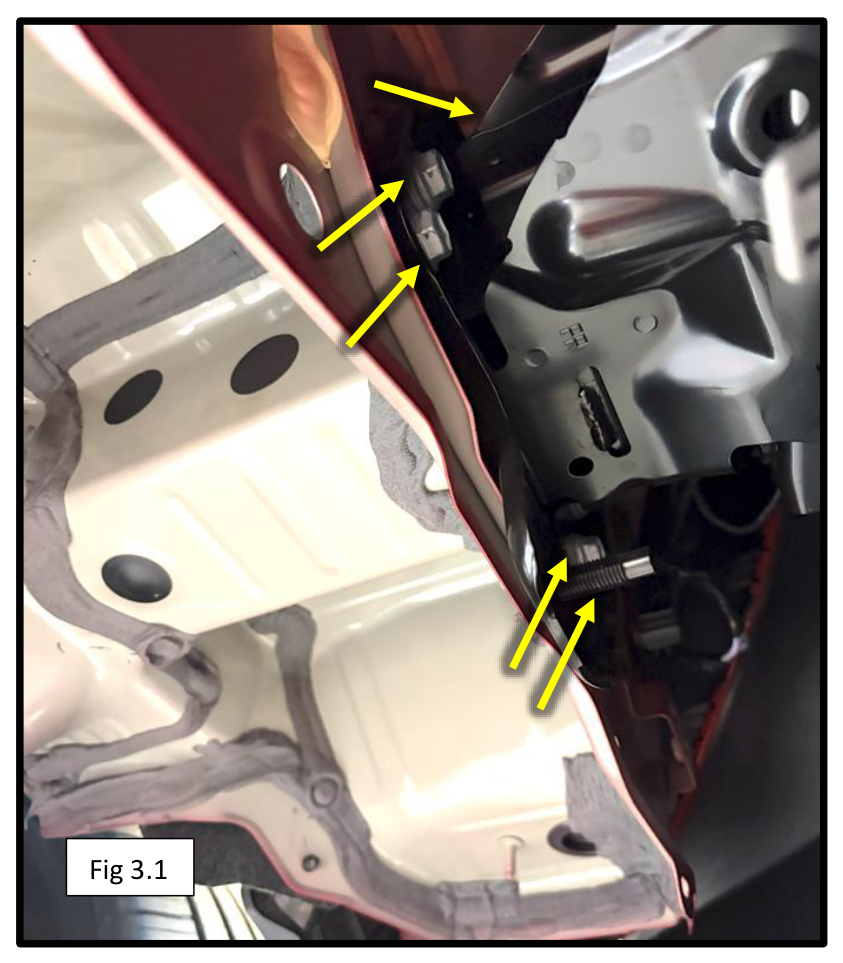
Step 3: Loosen the Rear Crossmember
Next you'll temporarily free up the rear crossmember so you can reach into the end of the frame. Reach up into the bumper area and you'll find the bolts and nuts holding it in place.
•Remove the eight bolts and two nuts securing the rear crossmember (Figure 3.1).
•Slide the crossmember to the side, just enough to open up access to the hole at the end of the frame. You don’t need to fully remove it.
| Don’t worry: You’re not removing anything permanently here. The crossmember goes right back in a couple of steps, torqued to spec. |
Step 4: Fish the Carriage Bolts Into the Frame
This is the part that looks tricky but is actually kind of satisfying. The “bolt fishers” are flexible coiled wires that let you guide a bolt through the inside of the frame and out the end.
•Insert the coiled end of a 1/2" bolt fisher into the forward-most frame hole and route it out the end of the frame.
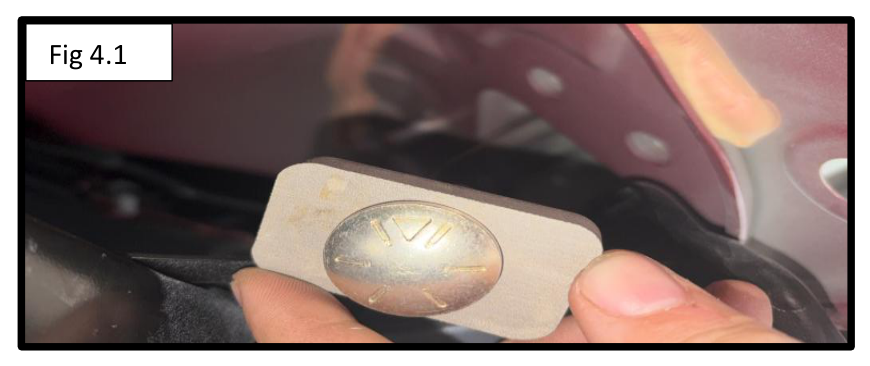
•Slide a 1-1/4" x 2" plate washer onto a 1/2" x 1-3/4" carriage hex bolt (Figure 4.1).
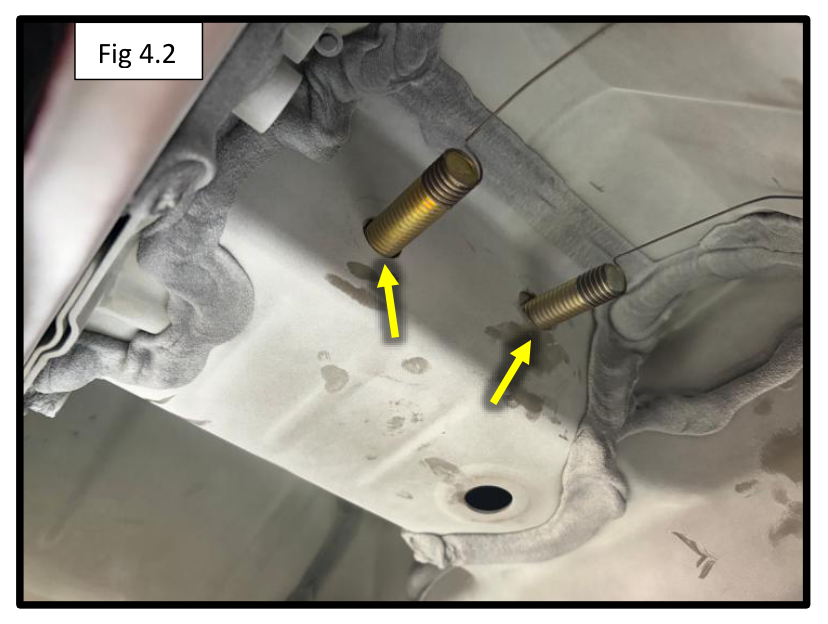
•Thread that bolt onto the fisher, then gently pull the fisher back to draw the hardware into the frame (Figure 4.2).
•Repeat for the rear-most hole, then do both holes on the passenger side.
•Leave the bolt fishers attached for now, they’ll help you line everything up in the next step.
•Reinstall the rear crossmember and torque the factory bolts to 35 ft-lbs (46 Nm).
| Pro tip: Pull the fisher slowly and steadily. If it snags, back off a little and wiggle it, never yank hard. Letting the bolt find its own path keeps the threads clean. |
Step 5: Hang the Frame Plates
Now you'll install the driver and passenger frame plates. These bolt up over the studs and capture the carriage bolts you just fished through. Keep everything just hand-tight here, you'll do the final tightening once the hitch is on.
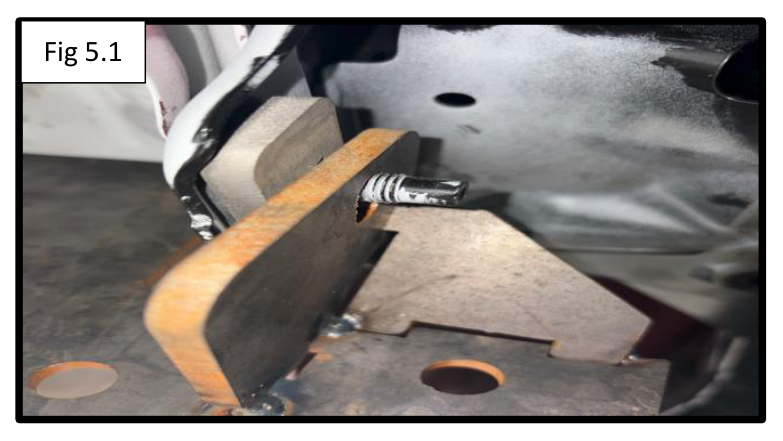
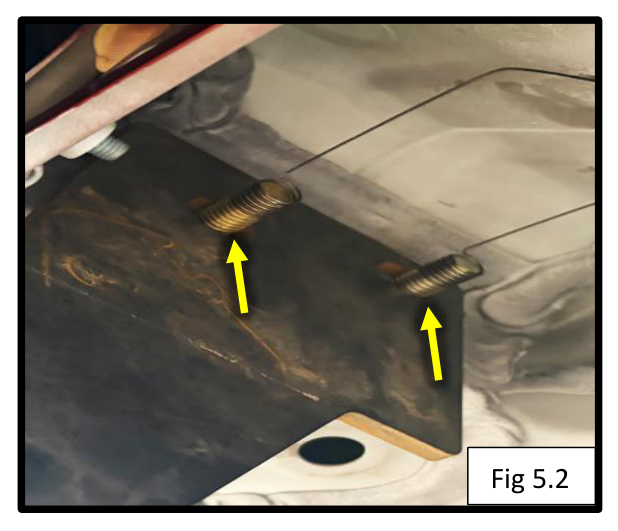
•Place a 1-1/4" x 2" plate washer over the lower crossmember studs (Figure 5.1).
•Set the frame plate over the stud while feeding the bolt fishers through their matching holes.
•Add a 3/8" split lock washer over the stud and thread on an M10 hex nut.
•Pull the carriage bolts out of the frame and through the frame plate, then secure each with a 1/2" flat washer, a split lock washer, and a 1/2" hex nut (Figure 5.2).
•Leave everything loose for now, do not tighten yet.
| Why leave it loose? Keeping the hardware loose lets the hitch slide into alignment in the next step. If you tighten now, the holes may not line up. |
Step 6: Lift the Hitch Into Place and Torque Everything
This is the step where it all comes together and where that extra set of hands really helps. Lift the hitch up and line up its holes with the holes in the side plates you just installed.
•Lift the hitch into place and align it with the holes in the side plates.
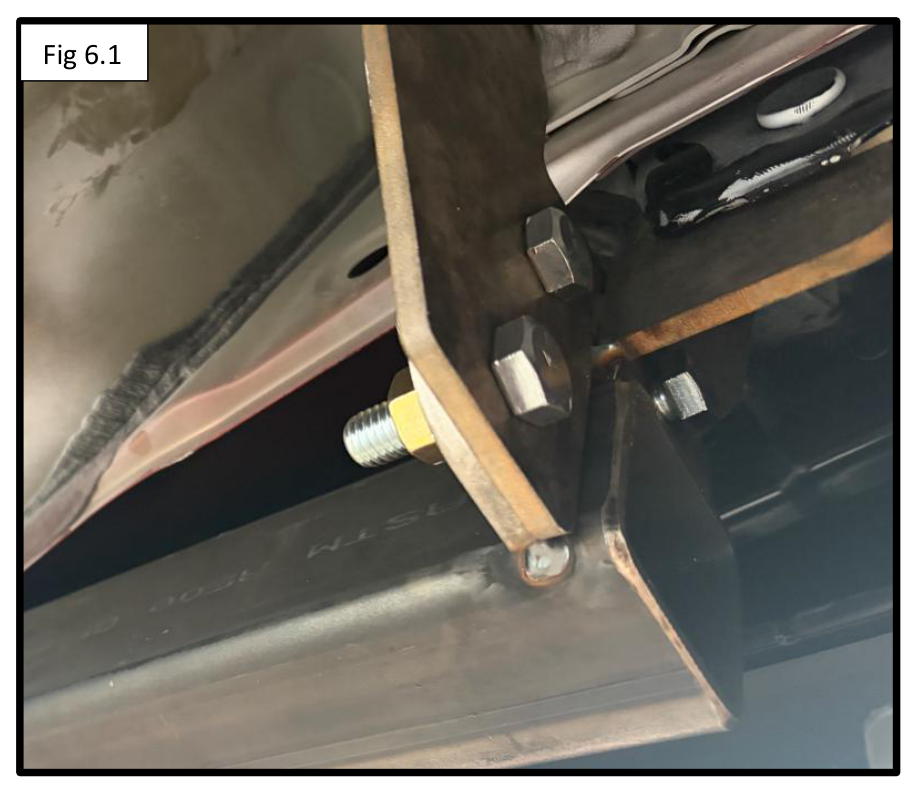
•Secure the hitch with three 1/2" x 1-1/2" bolts per side.
•On each bolt, use a split lock washer and a 1/2" hex nut (Figure 6.1).
Now go around and torque everything to spec, in this order:
•Crosstube bolts (the 1/2" bolts holding the hitch): 80 ft-lbs (108 Nm)
•M10 nuts: 35 ft-lbs (46 Nm)
•The four 1/2" carriage bolts: 80 ft-lbs (108 Nm)
| Important: Use a torque wrench for every fastener here, don’t eyeball it. Proper torque is what keeps your hitch safe and solid on the road. Snug isn’t the same as torqued. |
Step 7: Trim the Covers and Reinstall
Almost done. The hitch receiver needs a little clearance to poke through the lower plastic covers, so you'll make a small, clean trim in each one before reinstalling.
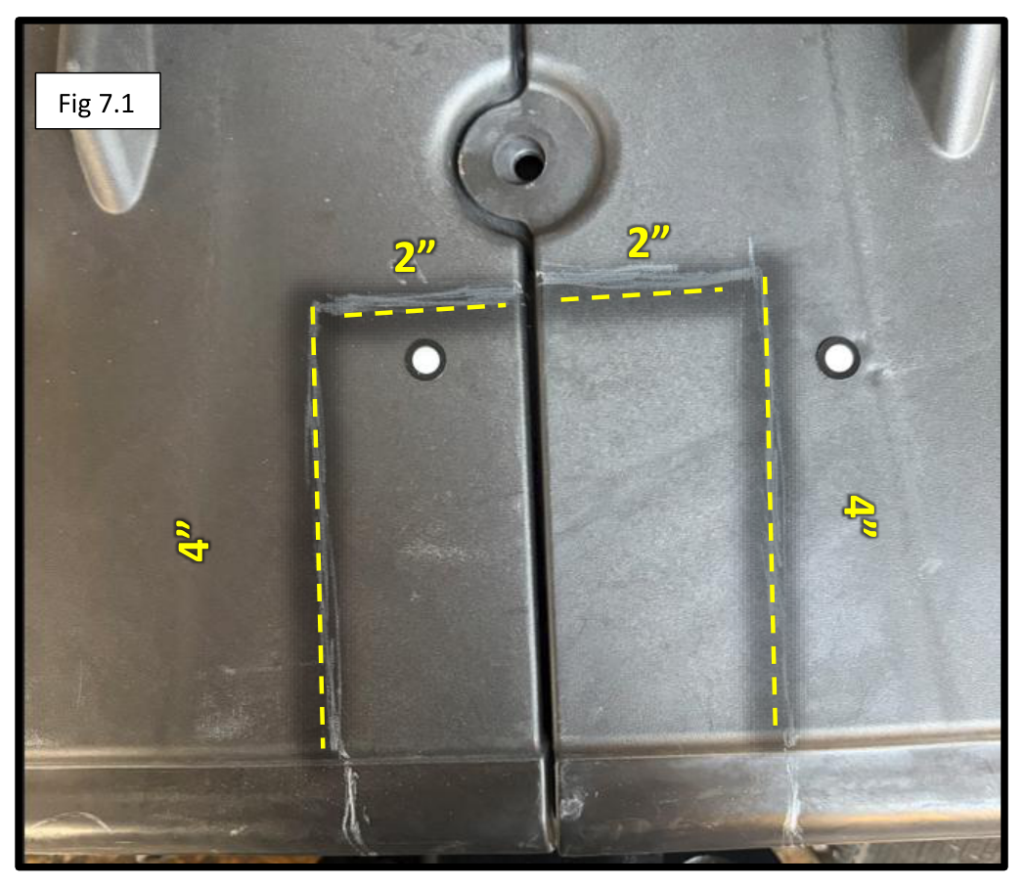
•Lay out the trim on the lower plastic covers using the measurements shown — roughly 2" across the top and 4" down each side (Figure 7.1).
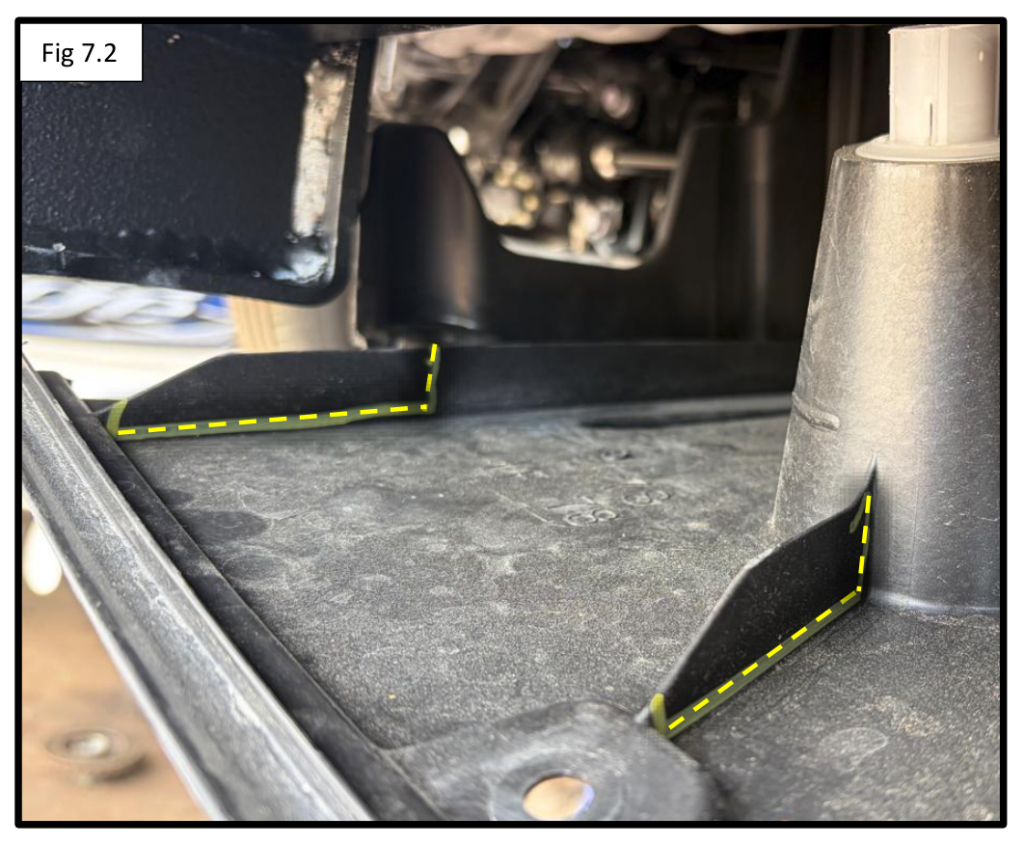
•Trim the receiver/crosstube clearance with a reciprocating body saw or a similar fine-blade tool. Go slow and follow your line.
•Reinstall the lower panels using the clips and plastic nuts you set aside back in Step 1.
Pro tip: Measure and mark your line before you cut, and start with a slightly smaller opening — you can always trim a little more. It’s a lot harder to add plastic back.
You’re Done — Installation Complete!
That's it, your EcoHitch is installed. Step back and take a look: the covers should sit flush, the receiver should poke through cleanly, and every fastener should be torqued to spec.
Before your first tow, double-check your torque values one more time and make sure you're staying within the 450 lb tongue / 3,500 lb trailer ratings. Nice work, you just saved yourself a shop bill and learned something new along the way.