Installation Disclaimer: This blog is intended as a general reference only. It may not include every step, tool, torque specification, or vehicle-specific detail needed for your installation. Always refer to the official installation instructions included with your product for the complete procedure, required tools, torque values, safety information, and fitment details.
Installing front tie downs on your Ford F250 or F350 is a straightforward process that significantly enhances your truck's capability to secure cargo and campers. This guide walks you through the installation of the F2022 front tie downs, covering both passenger and driver side installations.
Initial Preparation
Before beginning the installation, you'll need to prepare both sides of your truck by loosening the leaf spring hanger nuts. Use a mallet to tap these nuts outward, away from the middle of the truck. This creates the necessary clearance for installing your new tie down system.
Passenger Side Installation
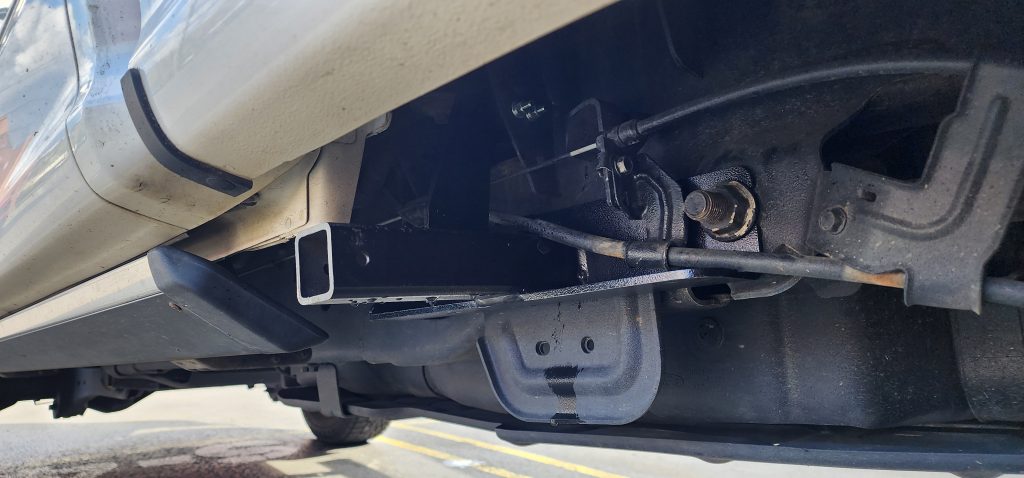
Removing the Exhaust Hanger Bracket
Start on the passenger side by removing the exhaust hanger bracket. Keep the clip-on nuts in place during this step, as you'll need them later in the installation process.
Fishing the Hardware Through the Frame
Using the provided bolt fisser and hardware, fish the bolts through the hole at the top of the frame to the circular hole toward the front of the frame. This step requires patience and precision to ensure proper alignment.
Keep the bolt fisher attached during this process. This prevents the hardware from falling back inside the frame if you lose your grip.
Installing the Tie Down
With the bolt fisher still on, slide the tie down onto the mounting hardware. Position it between the gap of the leaf spring hanger nut, then assemble your hardware onto the bolt.
Securing the Upper Hardware
Use the smaller hardware provided to secure the upper mounting points. Assemble these through the smaller hole at the top on the vertical gusset and the receiver.
Installing the Support Strap
Return to the same initial hole you used earlier and fish the bolts through again. This time, feed them to the hole on the inner portion of the frame. This creates a mounting point for your support strap, which will assemble to both the frame and the receiver simultaneously.
Final Passenger Side Steps
Complete the passenger side installation by:
- Tightening the leaf spring hanger nut
- Torquing all hardware down to the proper specifications
- Reinstalling the exhaust hanger bracket over the support strap using the factory hardware
Driver Side Installation
Removing Brackets and Wiring
The driver side follows the same general method as the passenger side, but requires additional preparation. Remove the wiring and e-brake bracket to make the installation easier. You may also need to remove a plate component depending on your specific truck configuration.
Fishing Hardware Through the Frame
Use the same method for fishing the hardware through the frame as you did on the passenger side. Keep your bolt fisher attached to prevent hardware from falling back inside the frame.
Installing the Receiver
Once you get the receiver positioned on the frame, remove the fishers and install the appropriate hardware. This ensures a secure, permanent mounting point for your tie down system.
Upper Hardware and Bracket Reinstallation
Install the upper hardware using the same technique as the passenger side. After securing all mounting points, reinstall the e-brake bracket in the same location where it was originally positioned.
Final Assembly
To complete the installation, slide the insert into the receiver and secure it with the provided bale pin. This final step locks everything in place and prepares your tie down system for use.
Important Reminders
Always torque your hardware down to the proper specifications as outlined in your installation instructions. Proper torque values ensure the safety and longevity of your tie down system.
The installation instructions for Torklift products are updated regularly. Always refer to the most current version included with your product for the latest information and specifications.
Frequently Asked Questions
What tools do I need for this installation?
You'll need a mallet for tapping the leaf spring hanger nuts, as well as standard hand tools for removing brackets and tightening hardware. Always consult your installation instructions for a complete tool list.
Do I need to remove components on both sides of the truck?
Yes, but different components. On the passenger side, you'll remove the exhaust hanger bracket. On the driver side, you'll need to remove the wiring and e-brake bracket.
Why should I leave the bolt fisher on during installation?
Leaving the bolt fisher attached prevents bolts from falling back inside the frame if you lose your grip while positioning hardware. Remove them only after the receiver is properly positioned.
What is the purpose of the support strap?
The support strap provides additional structural support by connecting to both the frame and the receiver simultaneously, distributing load forces more effectively.
Where can I get help if I have questions during installation?
For any questions about your Torklift product installation, visit torklift.com or call 800-246-8132 for expert assistance.