
Blog
How to install a RV electrical hatch

Torklift designed a lockable shore power cord cover called the Fortress PowerLock. It protects the RV power cord from being cut or stolen. This is the only lock available for shore power cords in the industry and protects you from having to pay hundreds of dollars in repairs and replacements. Crafted out of aircraft grade aluminum, the locking shore power hatch is available in white or black high impact powder coat to match your trailer color. This product is proudly made in the USA and comes with our Legendary Lifetime Warranty.
How do I install the Fortress PowerLock?
 The Fortress PowerLock is easy to install – so easy in fact, it can be done in a matter of 10 minutes and give you peace of mind for a lifetime!
When you receive your kit – the Fortress PowerLock comes with four stainless steel tapping screws and two keys.
- Start by removing the existing electrical hatch from the exterior of the camper, and remove the power cord from the back of the electrical hatch.
- Clean any remaining sealant from the camper and hatch. To ease your reinstallation, leave the power cord protruding from the camper.
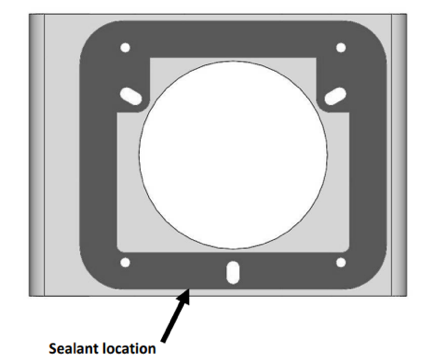
- Using your preferred sealant, seal the back side of the Fortress PowerLock.
- Be sure to seal all the holes as well as the perimeter of the Fortress PowerLock.
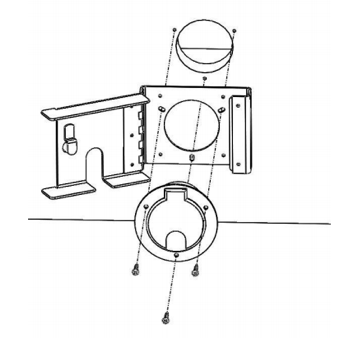 Next, seal the backside of the flange on your original electrical hatch. Install the original electrical hatch into the Fortress PowerLock, and place the power cord into the back side of the electrical hatch. Slide the cylindrical portion of the electrical hatch with power cord into the opening in the camper.
- Reinstall your original hardware through the three holes in the electrical hatch (shown to the right)
- Optional: If you feel that the original mounting hardware or condition of the original holes is not up to the task of securing the power cord, the four remaining holes can be screwed into place.
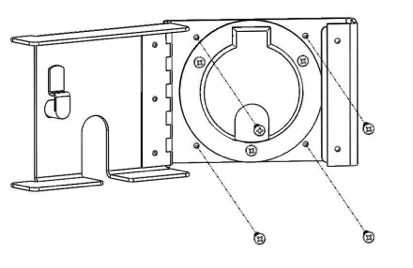 Pre-drill the remaining four holes in the Fortress PowerLock with a 1/8” drill bit, and install the four #10 x 1¼” stainless steel self-tapping screws (shown to the right). After the screws have been installed, remove any excess sealant away from the edges of the Fortress PowerLock.
Now it’s installed and ready for use! See how easy that was? All you need to do is close the door, insert the key and turn it clockwise and your shore cord is protected! Below is a video demonstrating how the Fortress PowerLock shore power cord door provides the ultimate protection:
If you have any questions on how to install this shore power protection or for more information about the Fortress PowerLock, contact us at 800.246.8132!
 Written by Shyann Guerra:
Being in an environment in which I can problem solve is where I flourish. Every answer to a problem leads me to a new concept to understand or a lesson to learn. When I'm not solving problems I enjoy camping and going to festivals with my family - from the local city center festivals to the mountains of Wenatchee at the Winter Grass, blue grass music festival. Experiencing culture is where my heart is content.